Monday, November 21, 2011

Effective Focusing

Most people know how to focus a lens, but don't know how to focus well.
In the days of film, lenses didn't have motors and electronic focus confirmation chips, so they had to be manually focused. Today, almost all cameras have Automatic Focus(AF). You can try using Manual Focus(MF) on your DSLR if you feel adventurous, but the focusing screens that come with todays entry level DSLRs are not optimized for MF(they lack focus aids like split screens and micro-prisms. Besides this, they do not resolve finer DoF for apertures larger than f/3.5). Knowing how to use your AF is the key to quick & accurate focusing.
This is what my Canon 400D viewfinder looks like:
It has 9 focus points that you can select(the little rectangles with dots you see). You can select an individual point or use the matrix mode(multi-point). Someone asked me, why I use a single point over multi point. The answer is simple. How is the camera supposed to know what I want to focus on? It just guesses. And as far as I know, when in multi-point mode, the camera focuses on the closest object that lies on any of the focus points.

Another thing to remember is the central point(which is a cross-type sensor) is the most accurate among them all. So I usually prefer to always keep the central focusing point selected, focus and recompose, then take the shot... and I advise you to do the same(unless you are shooting macro or a close object with a wide angle lens, in which case you use the closest focus point to the area you want in focus). Except for the underlined situations, shifting the camera sideways or rotating it about the optical centre after focusing will not throw the point outside the DoF range, keeping it in focus.

To get more control of the focusing, I recommend that you switch to 'back button focusing' rather than half-click the shutter release to focus. Read your camera manual on how to do that. You will then focus by pressing a button on the back of the camera(the '*' button on my 400D)

Sometimes, especially in low light, the camera will struggle to focus. A little insight into how autofocus works will help you here.

When autofocusing, the camera's focus sensor turns the focus ring so as to maximize contrast(the difference between black & white, or colours). You can try focusing on a blank white wall, even if there is lots of light, the camera will struggle to focus. Now try focusing on a speck on the wall. It locks focus immediately!

Here is an example:

This was shot @44mm at f/2.8. The DoF is quite shallow, cause of the large aperture and close distance of the subject. Lets zoom in to 100%
Since 'Canon' is not at the centre of the original image, I used the focus and recompose technique(using the central focus point). In the zoomed in image, you see two possible locations at which I could have kept the central focus point for getting 'Canon' in focus.(the red and green squares). Both lie on the same plane. However, the red square is over pure black area, therefore lacking contrast, and the camera will not focus easily. On the other hand, the green square partially lies on black and partially on white... the camera will easily be able to resolve focus to get the highest contrast. Hence the green square location is preferred over the red square location while focusing.
In short, always place the focus point over an area of contrast.

Wednesday, November 16, 2011

All Articles

I noticed its a little difficult to navigate through this blog and find what you want, so I decided to make this page which contains links to all articles. I will keep updating this as and when I post more articles. I think you can guess the article name from the address, so no point in adding the title here. These articles are in the order in which they were written, from oldest to newest:

http://photog4beg.blogspot.com/2010/12/what-is-photography.html

http://photog4beg.blogspot.com/2010/12/camera-modes.html

http://photog4beg.blogspot.com/2010/12/aperture.html

http://photog4beg.blogspot.com/2010/12/shutter-speed.html

http://photog4beg.blogspot.com/2010/12/iso.html

http://photog4beg.blogspot.com/2010/12/art-of-panning.html

http://photog4beg.blogspot.com/2011/01/composition.html

http://photog4beg.blogspot.com/2011/05/composition-examples.html

http://photog4beg.blogspot.com/2011/05/why-i-still-love-my-nifty-fifty.html

http://photog4beg.blogspot.com/2011/05/zoom-perspective.html

http://photog4beg.blogspot.com/2011/05/about-histograms.html

http://photog4beg.blogspot.com/2011/05/about-flash-part-one.html

http://photog4beg.blogspot.com/2011/05/about-flash-part-two.html

http://photog4beg.blogspot.com/2011/06/how-to-chose-camera.html

http://photog4beg.blogspot.com/2011/06/pseudo-hdr.html

http://photog4beg.blogspot.com/2011/08/exposure-zone-system.html

http://photog4beg.blogspot.com/2011/10/lightroom-basics-part-1.html

http://photog4beg.blogspot.com/2011/11/lightroom-basics-part-2.html

http://photog4beg.blogspot.com/2011/11/effective-focusing.html

http://photog4beg.blogspot.com/2012/01/lightroom-intermediate-1-tone-curve.html

http://photog4beg.blogspot.in/2012/04/nissin-di466-review.html

Lightroom: Basics Part 2

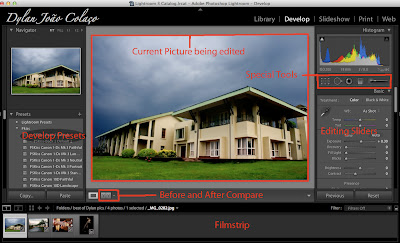
So now, lets enter the Develop Module of Lightroom where we will spend most of our time.
On the left side you have a navigator preview. When you zoom in ('Z' or Spacebar), it will show you which part of the image you are zoomed into.(using a red box)
Below it, there is a presets pane. You can use factory presets(a combination of specific settings) or you can make you own and use(or download other peoples from the internet). Below that you have 'Snapshot' where you can save how the image looks currently if you wish to try something but come back to the current state later. After that you have 'History'.

One of the best things about lightroom is that it is a non-destructive editor. This means that it does not make changes to your original photographs. The catalog imports images and stores all your changes as 'steps', which it applies to the image when showing you. After making all changes you can export the image. 'History' lets you go back to how the image looked at any point in time since you imported it till the current state! Pretty awesome huh?!
You can also copy settings of one image and paste them on another image.

Below the main photo area, there is an option for viewing Before&After (Its a small box with [Y|Y] ) to compare the original image and the current state.

On the right side is the histogram followed by all the sliders and controls. We'll go over the basic ones now, and cover the more advanced ones in a future article.

I will assume that you know how to read a histogram here; if you do not, then please read it here: http://photog4beg.blogspot.com/2011/05/about-histograms.html or somewhere else before continuing, as it gives you some idea of where to start editing.

Editing Sliders:

Basic

Lets start off with white balance. In case you dint use custom white balance or your auto white balance dint hit the nail, chances are your image has a colour tint to it. You can either balance it manually using the Blue/Yellow and Green/Magenta sliders, or use the colour picker, and click a part of the image that you know was neutral(white or grey). Lightroom automatically corrects the colours of all other pixels in the image.

After white balance, we deal with exposure problems. Our light meters are not perfect, and you will usually end up with a not-so-perfectly exposed image. Even if it is well exposed, it may lack contrast due to the nature of the scene.
I advise you to look at the histogram and observe the changes as you move the following sliders. Then interpret the results and see if they make sense to you.

Exposure: The way it changes the brightness of pixels is similar to what changing the ISO on the camera does, except for the fact you cannot get detail that was in the scene but not captured. It affects pixels of all values 'equally'. However, brightness values are not linear, but follow a gamma function, and so the brighter parts of the image will shift faster than the darker areas, in the histogram.

Recovery: Sometimes when we take a picture, the highlights can get clipped to white or near white in a scene with lots of dynamic range. Recover helps decrease the brightness of the brightest pixels in the image. In other words, it darkens the highlights. Its a very subtle though and is one of the few effects you can use to 100% without making the image look unnatural.

Fill Light: This slider is used to brighten up the shadows(dark areas) of the image while not affecting the rest of the image by much. Be careful as it can make a lot of noise visible if used excessively.

Blacks: It is used to darken the dark areas of the image. Mainly used to set the black-point if the image does not have one. Usually slide it till the first grey part of the histogram touches the left wall (this means the darkest part of the image is remapped to pure black) Helps improve the contrast of the image.

Brightness: Similar to exposure, but it tries not to clip the highlights when increased.

Contrast: When increased, darkens the dark areas and brightens the bright areas of the image.(and affects everything in between)

Clarity: Changes regional contrast. Increasing makes images large edges more clear. Decreasing causes a sort of flat softness look.

Saturation: Increases the vividness or intensity of colour of all pixels by the same proportion.

Vibrance: Like saturation, but increases the intensity of colour of the undersaturated pixels more and the already saturated pixels less. Prefer using it over saturation.

Skip Tone Curve, HSL and Split Toning for now.

Head over to Detail. (You must zoom 100% or more into the image to see the effects of sharpening and noise reduction)

Sharpening: Sharpening Basically tries to make an image look sharper by increasing the contrast of 'edges'. Note that it does not add more detail to what has already been captured. Holt the "ALT" key when moving sliders to see their affect on the luminance channel.(It should appear grayscale when adjusting)

     Amount: It defines how much to affect the edges.
     Radius: It defines the area around detected edges that will get affected (Radius in pixels)
     Detail: Affects sharpening of finer details in the image
     Masking: As you increase it, it masks areas of progressively larger and larger edges(first small, then larger and larger) from the sharpening filter. Hold "ALT" and you will see the areas masked as black and areas that will be affected by the sharpening filter in white.

  
Noise Reduction: At High ISO and/or in low light, camera sensors generate noticeable noise. Lightroom helps you remove this noise while preserving detail in the image. There are two types of noise, i)Chroma or Colour noise-> Random colored specks(like green or blue) and ii)Luminance noise (specks of the right colour, but largely varying brightness, even white sometimes).

Vary the colour slider first and remove as much colour noise as possible without affecting detail too much.(colour noise is easier to see than luminance, so remove it first). Then use the detail slider under it to try and bring back detail that was taken out by mistake by the noise reduction. Use it till you see actual specks on noise beginning to re-appear.

Then target the luminance noise in the same way. It has an additional slider "contrast" which affects larger edges than detail. Try it.

When I get time to write the next article, I'll try and cover the Tone Curve, Channel Mixer(HSL) and Split Toning. Happy Editing. And remember, it very easy to over-edit something.... Everything in moderation!(Subtle improvements are best and most natural)

After making all the changes, export the image: File>Export. Choose your folder and other options and click the export button.


Thursday, October 27, 2011

Lightroom: Basics Part 1

So you've taken a picture, hopefully with good composition and exposure. But still there's something missing... it lacks the 'punch' that you see in pictures that professionals have taken. You might start to think your camera & lens are not good enough... or that you've done something wrong when taking the picture.

Well actually, theres one step left in your workflow-> post processing... or simply Editing if you like. Editing is not new to digital photography; its been there since the days of film. But today thanks to our very capable computers, we don't have to toil away in a darkroom for hours.

There is a wide variety of editing software available, and you can choose one that suits your needs.
The most famous is probably Adobe Photoshop, which is extremely powerful for image manipulations of all sorts. It is used by both photographers as well as designers. A free open-source alternative called GIMP exists for the same and is nearly as good.

Adobe probably realized that not everyone requires all the features and power of photoshop, and created a software specially for photographers, Lightroom. It has almost everything a photographer needs, without the extra bells and whistles that photoshop has, allowing a fast workflow. Apple's Aperture is an equivalent software. There are free alternatives, but I found nothing nearly as good.

After that you have Googles Picasa, Apple's iPhoto, etc. They are free or low cost, simple to use, but lack power. I suppose they were made for ordinary people who want one-click-enhance results. If you wanted that, you wouldn't be reading this right?

So then, lets focus on Adobe Lightroom.
Lightroom has 5 Modules- Library, Develop, Slideshow, Print & Web. All controls are organized by function and sorted into these modules. You can select a module on the top right.
Library is used for organizing files.
Develop is used for in-depth editing.
The rest are self-explanatory. I won't cover them here even in future articles.

In the Library Module, you can organize photos into 'Collections'. You can rate photos, flag them, compare them, etc.  In any module, you see all the photos in a film strip.

When you come from a photo trip or something, you may typically have 100s of photos. Not all of them are good. You need not edit them all. Heres where the library module shines.

The first thing I do after importing photos(which you can do by 'drag & drop' when in library module, or file>import) is going through all the images in the filmstrip and clicking 'X'(shortcut for unpick/reject) on the bad pictures(ones you think can't be saved by editing either). After going through all, just click Photo>Delete Rejected Photos. Why waste time editing bad pictures?

Next we will see the Develop module...

** I must mention here that it is preferable to shoot in RAW rather than JPEG to get the most out of your images, and edit them without any significant loss in quality. This is because JPEG cuts down tone variations from the 16bit RAW file(created by 12bit or 14bit A/D converters) to 8bits. JPEGS also have some amount of sharpening, noise reduction, etc done to them in-camera. RAW files are straight from the CCD or CMOS sensor.

Sunday, August 7, 2011

Exposure: The Zone System

Cameras use a device called a 'lightmeter'(which is in-built) to measure the lighting in a scene and calculate exposure. They do the latter depending on what "metering mode" you set. Evaluative/Matrix metering checks the whole frame. Centre-weighed metering gives 80% importance to the centre of the frame and 20% importance to the edges. Partial metering measures ~10% of area at the centre while Spot metering measures ~3%. The problem is, the camera will try to expose in such a way that the average of the measured areas has a luminance value of middle grey(18% reflectance). While this is probably the best manufacturers can do for measuring an 'average shot', your exposure gets screwed if you hav a frame full of dark objects or one full of light objects.

Ansel Adams(a very famous photographer in the old film days) developed a system for exposure, which with slight modifications can be applied to digital photography too. Before I explain it, I would like to give you an intuitive idea as to how this system works, from my perspective:
Say I use spot metering on some object which is dark grey. Using exposure compensation, I tell the camera "I see this object like this. I want you to capture it in this very shade, not made it brighter to look like middle grey"

Ansel Adams kept 10 zones in his system (zone 0 to zone 9) with 0 as the darkest and 9, the brightest. The amount of light reflected by each zone is double (1-stop greater) than the previous zone. Zone 5 is middle grey(18% reflectance).

Zone 3 to Zone 7 are of interest to us. Lets place colours into these zones now:
courtesy: photo.tutplus.com

Now to expose correctly, use spot metering over an area of one of the above known zones. Then use exposure compensation as follows:
Zone 3: -2EV
Zone 4: -1EV
Zone 5: 0EV
Zone 6: +1EV
Zone 7: +2EV

Lock the exposure, re-compose and take the picture(Spot metering meters at the centre of the frame). Using back-button focus  and half-click to lock exposure helps here!(For DSLRs only- read your camera manual if you don't know how to do this)

Sometimes the dynamic range of your camera might not be enough for the whole scene. In that case,  meter from something in zone 7(and set+2EV) to preserve highlights or from zone 3(and set -2EV) to preserve shadow detail, depending on what is more important to you in the photo(assuming you are not shooting HDR).

P.S. Zones numbers are written using Roman Numerals. I forgot about that when writing this article and only realized it when I added that picture from another site. Sorry about that, but I'm too lazy to change all the numbers now! :P

Friday, June 24, 2011

Pseudo HDR

Digital Cameras are no doubt brilliant devices. Their tiny CCD or CMOS chips can capture an enormous amount of detail. However, their dynamic range- the range of brightness values they can capture in one picture, is limited, a lot more than the human eye.

You may have noticed a lot of pictures with "washed out"(completely white, lacking any detail) skies or too dark subjects. In some cases, this problem can be fixed by using a flash to balance the lighting. However, you cannot expect to light up a huge building using a flash, to balance it against the bright sky!

HDR or High Dynamic Range technique to the rescue! This technique involves taking the same picture at multiple exposure settings and then merging and tone-mapping them using a computer. Usually 3 photographs are taken, exposures separated by 1 to 2 stops. Most cameras have an "Auto-Bracketing" setting, which takes these 3 pictures automatically when you hold the shutter release down.

There are 2 problems with this technique:
1) you need a tripod or a steady surface to keep the camera from moving between the 3 shots.
2) you cannot have a moving object in the frame, or you will get multiple "ghosts" of the object.

Since I don't like using a tripod and searching for a steady surface can limit compositions, I prefer using another technique called pseudo HDR when needed. This technique doesn't extract as much dynamic range as normal HDR, but it is much simpler and can be used for handheld shots or moving objects.

So basically you shoot in RAW format-> this stores a lot more detail than jpeg(by detail here I mean variation of tones, not more pixels!). You have to underexpose the snap by 1 to 2 stops to preserve some detail in the sky while retaining detail in the shadows.

After this, we have to post process to extract all the detail we can from the shadows and highlights:
Open it in Adobe Camera RAW/ Photoshop/ Lightroom/ Aperture
Change the following settings roughly to these values. Tweak to your taste.
Contrast between 90 to 110
Brightness between 70 to 90
Blacks between 5 to 7
Recovery to 100%
now raise the brightness to about 100-120
use the adjustment tools:
Burn(darken) the sky and dodge(brighten) the rest
use a soft large brush and ~exposure -1.8 for burning and +1.0 for dodging

Use noise reduction, sharpening and a slight vignette for a finishing touch.

What I got was this:

Saturday, June 4, 2011

How to choose a camera

Long time no post, and that is because I'm in Chennai, about 500 miles away from home and I don't have my DSLR with me. So I'll try and post on topics which do not require it while I'm here.

Many people ask me which camera should they buy, so I thought of writing an article which could help them make informed decisions on this matter without having to consult me :)

The first thing to see is your budget. How much are you willing to spend? There will always be a better more expensive camera, so you need to draw the line on the price before doing anything else.

The next question to ask is, what will you be shooting most of the while? If you do most of your shooting in daytime and you are on a limited budget, a megazoom camera may be more appropriate than a DSLR, as you will need to spend money on lenses for the latter.
A DSLR will however give you full control over practically everything, besides giving you pixel level sharpness and low noise at high ISO(compared to a compact digicam), besides the flexibility of being able to use various lenses.

For DSLRs:
Check the make. Prefer Canon or Nikon to Sony. I'm not anti Sony or anything, but Canon and Nikon have a much better variety of lenses and their noise profiles are also better than Sony as of date.

Check for lenses and other accessories that you would buy over time and see how affordable they are to you. Check the burst rate of the camera in case you like shooting sports. Try and get the maximum viewfinder coverage and magnification that you can. Check a couple of reviews on www.dpreview.com or www.dcresource.com Finally, go to a shop and see what feels best in your hands.

For Non-DSLRs:
Decide whether you want a megazoom or a good quality compact or a normal digicam. Try and get one with Manual mode, as you would like to have control over your images. Make sure you have manual white balance on the camera. See if the camera if capable of saving RAW files. Forget megapixels, anything above 3 is good, as long as you dont have to print billboard sized images! Try to get as large a sensor as possible. Usually CCD sizes are 1/2.5". Bigger than that is good. 1/1.8" is used in a few good cameras.

Since you have only one lens on this camera, you want to make sure its the best you are getting. Besides Zoom range, you want the lens to be fast, as in have a large maximum aperture. The max aperture range will be quoted like f/2.8-f/5.6
This means that the max aperture when zoomed out completely is f/2.8 and when zoomed in completely is f/5.6. you want these numbers to be as small as possible.

Recommendations:
As of now
Entry level DSLR: Nikon D3100
Megazoom: Panasonic FZ 35
Good semi-pro Compact: Canon S95 or the latest G series

Thursday, May 19, 2011

About Flash: Part Two


Now what you know about the power& distance limitations of a flash, lets see some stuff you can do with a flash.
There are two ways to use a flash:
1. As the primary source of light
2. As a secondary source (fill flash)

As a secondary source, you would expose the image for ambient light and let the camera adjust the flash strength via TTL(through the lens) metering, while giving a bias if needed(+1 flash EV will double the power, -1 will half the power that the camera has otherwise calculated using TTL metering). Av(/A) and Tv(/S) modes expose for ambient light and use flash as a 'filler'. Also called slow sync when long shutter speeds are used (slower than about 1/30s)

As a primary source, u underexpose the background by a lot and use the flash's power to completely light your subject(or whatever part of it you want to light up). In a reasonably dark place, P(rogram) mode does this... it will not expose for ambient light, only for the flash via TTL.  Will usually use a shutter speed of 1/60-1/200s. When used in this manner, the flash freezes the subjects movement and leaves no noticeable blur, because the flash strobe has a very short time duration (~1/10,000s) and the camera is NOT exposing for ambient light.

When to use the flash?
Indoors: When there is insufficient light or to balance a subjects exposure with backlighting if a window is open in the background
Outdoors: for portraits/ group snaps, to lessen harsh shadows and to create catchlights (the twinkle in the eye that you usually see)

In this example, I used flash to balance the indoor and window exposure. It was about 3pm and had I not used flash, there would be two possible outcomes depending on how you expose the snap:
i) The subjects would be properly exposed, but the window in the background would be completely blown out(highlights clipped), ruining the snap
ii) The window would be exposed correctly but the subjects would be silhouettes!
The only way out was to correctly expose ambient light of the window with the lightmeter while letting the camera use TTL-metered flash to expose the subjects.

Flashes used directly can produce harsh shadows and ruin texture and it is advisable to diffuse them i.e. make the source seem bigger. There are many ways to do this, the most effective is bouncing it off the ceiling/wall. This changes the light source from being hard to soft.

I may have mentioned in the past about the X-sync speed of a flash, which is ~1/200s on most cams, and it wont allow you to shoot faster than this with the flash on. However you can use an external flash which supports high-speed sync to use flash at higher shutter speeds. This is especially useful for shooting portraits outdoors when you want to use a large aperture to blur the background as well as use the flash to prevent harsh shadows.

Monday, May 16, 2011

About Flash: Part One

A fundamental requirement for a photograph is LIGHT. This light can be of various kinds. Some important ones are:
Hard light- Perceived as a point source, gives well defined, contrasty shadows. e.g. the sun on a clear day
Soft light- A large source, gives soft shadows. e.g. An overcast sky(the sun is hidden behind clouds)
Transmitted- When the source of light is in the frame. e.g. A sunset
Each type of light has its uses (for portraits, soft light is generally preferred), and you cannot say one type of light is 'better' than another(in the absolute sense).

There are many instances when we need to artificially add light into the frame, for various reasons(some of which I will discuss in later parts of the article). One way of adding light is using a flash.

Flashes may be built into the camera (e.g. a pop-up flash) or may be an external unit. The power of a flash is expressed as a "guide number" in meters or feet(@ISO 100).

This formula will tell u how far a flash can expose a subject.

f-number x distance x sqrt(100/ISO)= Guide number

*sqrt= square root for those who dont know.

My canon 400D flash has a guide number of 12m... lets see what dat looks like in a practical situation:
Say I use a reasonable aperture of f/4 and ISO 400... then
4 x D x sqrt(100/400) = 12m
4 x D x 1/2= 12m
D=6m

So the flash can effectively expose a subject upto a distance of 6 meters, with the above settings.

If I keep the aperture constant and change the ISO to 100, the max distance the flash will expose is 3m.
for ISO 800, it will be 6 x 1.414= 8.5m

The reason for the square-root is because of the way light intensity varies with distance (inverse-square rule).
Say I have a constant source of light. Suppose, when I stand at a distance of 10 m from it, I receive 100 lux of light intensity, if I go another 10 meters away from the source (total of 20m from the light source now), I will receive 25 lux.(1/4th the original intensity when at double the distance)

#Remember that doubling the f-number (say from f/4 to f/8) reduces the light by a factor of the square of the ratio(in this case (8/4)^2 or by a factor of 4), that is why there is no square root function required for the f-number.

For 'ordinary lenses', the maximum aperture available varies with zoom. Take an 18-55 f/3.5-5.6 lens. When zooming in therefore, the maximum range of the flash is reduced. (With a constant aperture lens, this does not happen)

------------ More coming later in Part Two---------------------------

Sunday, May 8, 2011

About Histograms

One major advantage of Digital over Film is that you can see the results instantaneously, and if needed change the settings and re-take the shot. We normally use the camera's LCD screen for that. However, LCD screens can be deceptive. A more accurate way of determining whether the exposure was correct or not is using the histogram. Almost all digital cameras have them, so lets learn how to read and interpret them.

First of all, a histogram is nothing but a bar chart. Lets take a look at a simple example of a bar chart:
This bar chart is of a hypothetical mark distribution in a class. On the Y(vertical) axis, we have number of students. On the X(horizontal) axis, we have categorized marks into 4 groups, 0-25, 25-50, 50-75 and 75-100. You can see that the height of each bar is proportional to the number of students getting marks that fall into that group.

A histogram is basically the same thing. Instead of number of students on the Y axis, we have number of pixels. On the X-axis, instead of categorizing students by their marks, we categorize pixels by their brightness values, into 256 categories, ranging from 0-255 (for jpeg, 8-bits=>2^8=256 values). 0 represents pure black, while 255 represents pure white. A typical histogram looks like this:

You will not see all this, of-course. The camera will only display the distribution, to save space:
So now, the taller the bars in a specific region, the more the number of pixels having those brightness values. So how do you use this for exposure?
A normal image will have a full spectrum of tones ranging from black to white, well distributed. If the histogram has too many pixels on the left side, it means your image is underexposed, while if there are too many on the right side, the image is over exposed. If you have a very tall bar just near 0 or 255, it means the shadows or highlights respectively are clipped(lost all detail). You may have many times experienced highlight clipping... the sky becomes completely white, losing all detail of clouds, etc.

See this example of histograms of differently exposed images:
Courtesy: http://www.thecolorblindphotographer.com/

So next time you take a picture, don't rely on the LCD screen. Take a look at the histogram too!(and underexpose/overexpose if necessary)

PS: Sometimes the histogram SHOULD have more values on one side, for example snow. It should appear white-ish in the image, so you want most of the pixels to be on the right side. However using the histogram, make sure the highlights DO NOT get clipped.

Wednesday, May 4, 2011

The Zoom Perspective


You may have heard people say that a Wide Angle lens expands space while a Tele Photo lens compresses it... What exactly does that mean? 

Have a look at these 2 pictures:

focal length=17mm


focal length= 55mm

I've tried to keep the shoe(say subject) size the same in both photos by moving away when shooting on the tele end. But what is the big difference between these two?
Its the BACKGROUND, or rather the size of it.

When shooting with a wide angle lens, the background becomes a lot smaller than the foreground(as if when viewed with the naked eyes, they were separated by a large distance- hence the term expansion of space).

On the other hand, when using a tele lens, the relative difference between the size of the background and foreground is much less( as if when viewed with the naked eye, they are close by-> hence compression of space).

This also means that a wide angle lens gives more background than a tele lens.

I think the following diagram is self-explainatory as to why it happens:


So when composing an image, if you want to show a subject in its environment, use a wide angle lens. However, if your purpose is only the subject, a telephoto is preferable, so as to reduce the amount of clutter in the background.

Note: the 'normal' perspective of human vision is said to be equivalent to a  50mm lens on a 35mm film SLR/ full frame DSLR (sensor size same as 35mm film), which is ~30mm on a Canon crop body and ~35mm on a Nikon crop body DSLR.

Monday, May 2, 2011

Why I still love my nifty-fifty


left: Canon 17-55mm f/2.8 USM IS (f/2.8 is the fastest they make zoom lenses till date)
right: Canon 50mm f/1.8 (popularly called the nifty-fifty)

Although I recently got an AWESOME Canon 17-55 f/2.8 constant aperture zoom lens (which allows f/2.8 regardless of how much I zoom in, unlike other typical zooms [eg canon 18-55 f/3.5-5.6]), I still love my 50mm lens. Here's why:
1. Size: See the comparison picture above!
2. Weight: the nifty is just 130g in weight, while the 17-55 weights 645g, which is heavier than my 400D body!(and can get quite tiring if used over long periods of time)
3. Speed(aperture): The nifty can take in more than double the amount of light than the 17-55, when both apertures are set wide open( f/1.8 vs f/2.8), effectively allowing higher shutter speeds to be used with the same ISO thereby reducing motion blur, or alternatively lower ISO to be used with the same shutter speed thereby reducing noise.
4. Price: Primes are cheaper than zooms(especially large aperture zooms). Period!
5. No Zoom!- Zooms tend to make me lazy. The nifty makes me walk around searching for the best vantage point to shoot from.
6. DoF: The shallowness of the depth of field at f/1.8 is enchanting!
The nifty is also more flair resistant and suffers from less chromatic aberrations (like purple fringing at high contrast edges)

I've tested the sharpness of both lenses @ f/2.8 and found them very similar. I surprisingly found the 17-55 slightly sharper, but just by a hair, probably because of the USM accuracy. Both these lenses blow away normal zoom lenses in terms of sharpness.


Depth of field example @ f/1.8

I highly recommend buying the 50mm f/1.8 (or the f/1.4 if you can afford it- 3 times the price of the f/1.8). It should be the 2nd lens you own (the first being the kit lens that comes with your DSLR). I guess the 35mm [f/2(canon) or f/1.8(nikon)] is also great for non full frame DSLRs.


Sunday, May 1, 2011

Composition Examples


Example 1:

The first thing you will notice is it follows the rule of the thirds.... There are 2 important points of interest here... The first one is the eyes, which have been placed on the upper 1/3rd horizontal line.
The second point of interest is what the eyes are looking at- the figure being drawn, which has been placed on the lower 1/3rd horizontal line
The frame has also been almost filled by the subject. A mistake many beginners tend to make is including the whole body. This creates unnecessary waste of space and also brings in distractions. Don't be afraid to cut out the top of the head, etc by the frame edges.
Shot with my beloved 50mm f/1.8 lens @ f/2.8, ISO 400, 1/40s on aperture priority mode. I used an aperture value of f/2.8 to blur the background while keeping most of the subject in reasonable focus.
I focussed on the pencil tip, here's why- when there is a human in the frame, the first thing we look at is their eyes. If their eyes are not looking at the camera, but instead gazing at some other object, our eyes immediately look at that object next, within a fraction of a second.
If a person is looking into the camera you should in 95% of the cases FOCUS ON THEIR EYES.


Example 2:
The charm of this shot is its simplicity. Subject placed on the lower right intersection of the thirds. No distracting elements in the frame.
Shot @ ISO400, f/2, 1/125s on 50mm f/1.8 lens


Example 3:
Follows rule of thirds(fingers). Uses converging lines(strings) to draw the viewers eyes into the photograph. Directional lighting reveals texture, form and depth. Background with no distractions.
I took it using my iphone 3Gs's cam near a window which provided directional lighting. Adjusted black point using levels to make background pitch black.

Tuesday, January 4, 2011

Composition


It is the art of choosing and arranging elements in the frame to get the most aesthetic image.
I'm no expert on composition, so I will not write much about it here.
One rule that everyone must know is, the rule of the thirds.
Divide your frame by into 3 equal regions using 2 vertical lines. Then divide it further using 2 horizontal lines. You should get 9 equal regions in all.
Try to place points of interest near or on the points of intersection of these lines.


Another tool of composition is lines n curves. Use them to draw the viewer into the subject.
Read as much as u can find on composition, and apply the techniques. Your images will definitely improve. Also, look at art, and analyze it. As yourself, what makes you like it.
I recommend reading:
and digital-photography-school.com also has a lot.
Also try and read these books:
Within the frame by David duChemin
and The Photographers Eye by Michael Freeman

and everything else u find on composition. Learning is a journey, not a destination. Keep learning, keep shooting, keep living!