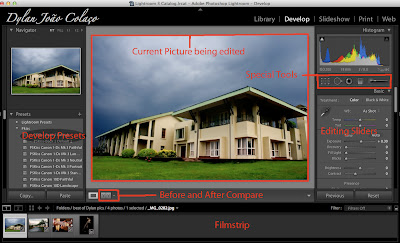
So now, lets enter the Develop Module of Lightroom where we will spend most of our time.
On the left side you have a navigator preview. When you zoom in ('Z' or Spacebar), it will show you which part of the image you are zoomed into.(using a red box)
Below it, there is a presets pane. You can use factory presets(a combination of specific settings) or you can make you own and use(or download other peoples from the internet). Below that you have 'Snapshot' where you can save how the image looks currently if you wish to try something but come back to the current state later. After that you have 'History'.
One of the best things about lightroom is that it is a non-destructive editor. This means that it does not make changes to your original photographs. The catalog imports images and stores all your changes as 'steps', which it applies to the image when showing you. After making all changes you can export the image. 'History' lets you go back to how the image looked at any point in time since you imported it till the current state! Pretty awesome huh?!
You can also copy settings of one image and paste them on another image.
Below the main photo area, there is an option for viewing Before&After (Its a small box with [Y|Y] ) to compare the original image and the current state.
On the right side is the histogram followed by all the sliders and controls. We'll go over the basic ones now, and cover the more advanced ones in a future article.
I will assume that you know how to read a histogram here; if you do not, then please read it here: http://photog4beg.blogspot.com/2011/05/about-histograms.html or somewhere else before continuing, as it gives you some idea of where to start editing.
Editing Sliders:
Basic
Lets start off with white balance. In case you dint use custom white balance or your auto white balance dint hit the nail, chances are your image has a colour tint to it. You can either balance it manually using the Blue/Yellow and Green/Magenta sliders, or use the colour picker, and click a part of the image that you know was neutral(white or grey). Lightroom automatically corrects the colours of all other pixels in the image.
After white balance, we deal with exposure problems. Our light meters are not perfect, and you will usually end up with a not-so-perfectly exposed image. Even if it is well exposed, it may lack contrast due to the nature of the scene.
I advise you to look at the histogram and observe the changes as you move the following sliders. Then interpret the results and see if they make sense to you.
Exposure: The way it changes the brightness of pixels is similar to what changing the ISO on the camera does, except for the fact you cannot get detail that was in the scene but not captured. It affects pixels of all values 'equally'. However, brightness values are not linear, but follow a gamma function, and so the brighter parts of the image will shift faster than the darker areas, in the histogram.
Recovery: Sometimes when we take a picture, the highlights can get clipped to white or near white in a scene with lots of dynamic range. Recover helps decrease the brightness of the brightest pixels in the image. In other words, it darkens the highlights. Its a very subtle though and is one of the few effects you can use to 100% without making the image look unnatural.
Fill Light: This slider is used to brighten up the shadows(dark areas) of the image while not affecting the rest of the image by much. Be careful as it can make a lot of noise visible if used excessively.
Blacks: It is used to darken the dark areas of the image. Mainly used to set the black-point if the image does not have one. Usually slide it till the first grey part of the histogram touches the left wall (this means the darkest part of the image is remapped to pure black) Helps improve the contrast of the image.
Brightness: Similar to exposure, but it tries not to clip the highlights when increased.
Contrast: When increased, darkens the dark areas and brightens the bright areas of the image.(and affects everything in between)
Clarity: Changes regional contrast. Increasing makes images large edges more clear. Decreasing causes a sort of flat softness look.
Saturation: Increases the vividness or intensity of colour of all pixels by the same proportion.
Vibrance: Like saturation, but increases the intensity of colour of the undersaturated pixels more and the already saturated pixels less. Prefer using it over saturation.
Skip Tone Curve, HSL and Split Toning for now.
Head over to Detail. (You must zoom 100% or more into the image to see the effects of sharpening and noise reduction)
Sharpening: Sharpening Basically tries to make an image look sharper by increasing the contrast of 'edges'. Note that it does not add more detail to what has already been captured. Holt the "ALT" key when moving sliders to see their affect on the luminance channel.(It should appear grayscale when adjusting)
Amount: It defines how much to affect the edges.
Radius: It defines the area around detected edges that will get affected (Radius in pixels)
Detail: Affects sharpening of finer details in the image
Masking: As you increase it, it masks areas of progressively larger and larger edges(first small, then larger and larger) from the sharpening filter. Hold "ALT" and you will see the areas masked as black and areas that will be affected by the sharpening filter in white.
Noise Reduction: At High ISO and/or in low light, camera sensors generate noticeable noise. Lightroom helps you remove this noise while preserving detail in the image. There are two types of noise, i)Chroma or Colour noise-> Random colored specks(like green or blue) and ii)Luminance noise (specks of the right colour, but largely varying brightness, even white sometimes).
Vary the colour slider first and remove as much colour noise as possible without affecting detail too much.(colour noise is easier to see than luminance, so remove it first). Then use the detail slider under it to try and bring back detail that was taken out by mistake by the noise reduction. Use it till you see actual specks on noise beginning to re-appear.
Then target the luminance noise in the same way. It has an additional slider "contrast" which affects larger edges than detail. Try it.
When I get time to write the next article, I'll try and cover the Tone Curve, Channel Mixer(HSL) and Split Toning. Happy Editing. And remember, it very easy to over-edit something.... Everything in moderation!(Subtle improvements are best and most natural)
After making all the changes, export the image: File>Export. Choose your folder and other options and click the export button.
On the left side you have a navigator preview. When you zoom in ('Z' or Spacebar), it will show you which part of the image you are zoomed into.(using a red box)
Below it, there is a presets pane. You can use factory presets(a combination of specific settings) or you can make you own and use(or download other peoples from the internet). Below that you have 'Snapshot' where you can save how the image looks currently if you wish to try something but come back to the current state later. After that you have 'History'.
One of the best things about lightroom is that it is a non-destructive editor. This means that it does not make changes to your original photographs. The catalog imports images and stores all your changes as 'steps', which it applies to the image when showing you. After making all changes you can export the image. 'History' lets you go back to how the image looked at any point in time since you imported it till the current state! Pretty awesome huh?!
You can also copy settings of one image and paste them on another image.
Below the main photo area, there is an option for viewing Before&After (Its a small box with [Y|Y] ) to compare the original image and the current state.
On the right side is the histogram followed by all the sliders and controls. We'll go over the basic ones now, and cover the more advanced ones in a future article.
I will assume that you know how to read a histogram here; if you do not, then please read it here: http://photog4beg.blogspot.com/2011/05/about-histograms.html or somewhere else before continuing, as it gives you some idea of where to start editing.

Editing Sliders:
Basic
Lets start off with white balance. In case you dint use custom white balance or your auto white balance dint hit the nail, chances are your image has a colour tint to it. You can either balance it manually using the Blue/Yellow and Green/Magenta sliders, or use the colour picker, and click a part of the image that you know was neutral(white or grey). Lightroom automatically corrects the colours of all other pixels in the image.
After white balance, we deal with exposure problems. Our light meters are not perfect, and you will usually end up with a not-so-perfectly exposed image. Even if it is well exposed, it may lack contrast due to the nature of the scene.
I advise you to look at the histogram and observe the changes as you move the following sliders. Then interpret the results and see if they make sense to you.
Exposure: The way it changes the brightness of pixels is similar to what changing the ISO on the camera does, except for the fact you cannot get detail that was in the scene but not captured. It affects pixels of all values 'equally'. However, brightness values are not linear, but follow a gamma function, and so the brighter parts of the image will shift faster than the darker areas, in the histogram.
Recovery: Sometimes when we take a picture, the highlights can get clipped to white or near white in a scene with lots of dynamic range. Recover helps decrease the brightness of the brightest pixels in the image. In other words, it darkens the highlights. Its a very subtle though and is one of the few effects you can use to 100% without making the image look unnatural.
Fill Light: This slider is used to brighten up the shadows(dark areas) of the image while not affecting the rest of the image by much. Be careful as it can make a lot of noise visible if used excessively.
Blacks: It is used to darken the dark areas of the image. Mainly used to set the black-point if the image does not have one. Usually slide it till the first grey part of the histogram touches the left wall (this means the darkest part of the image is remapped to pure black) Helps improve the contrast of the image.
Brightness: Similar to exposure, but it tries not to clip the highlights when increased.
Contrast: When increased, darkens the dark areas and brightens the bright areas of the image.(and affects everything in between)
Clarity: Changes regional contrast. Increasing makes images large edges more clear. Decreasing causes a sort of flat softness look.
Saturation: Increases the vividness or intensity of colour of all pixels by the same proportion.
Vibrance: Like saturation, but increases the intensity of colour of the undersaturated pixels more and the already saturated pixels less. Prefer using it over saturation.
Skip Tone Curve, HSL and Split Toning for now.
Head over to Detail. (You must zoom 100% or more into the image to see the effects of sharpening and noise reduction)
Sharpening: Sharpening Basically tries to make an image look sharper by increasing the contrast of 'edges'. Note that it does not add more detail to what has already been captured. Holt the "ALT" key when moving sliders to see their affect on the luminance channel.(It should appear grayscale when adjusting)
Amount: It defines how much to affect the edges.
Radius: It defines the area around detected edges that will get affected (Radius in pixels)
Detail: Affects sharpening of finer details in the image
Masking: As you increase it, it masks areas of progressively larger and larger edges(first small, then larger and larger) from the sharpening filter. Hold "ALT" and you will see the areas masked as black and areas that will be affected by the sharpening filter in white.
Noise Reduction: At High ISO and/or in low light, camera sensors generate noticeable noise. Lightroom helps you remove this noise while preserving detail in the image. There are two types of noise, i)Chroma or Colour noise-> Random colored specks(like green or blue) and ii)Luminance noise (specks of the right colour, but largely varying brightness, even white sometimes).
Vary the colour slider first and remove as much colour noise as possible without affecting detail too much.(colour noise is easier to see than luminance, so remove it first). Then use the detail slider under it to try and bring back detail that was taken out by mistake by the noise reduction. Use it till you see actual specks on noise beginning to re-appear.
Then target the luminance noise in the same way. It has an additional slider "contrast" which affects larger edges than detail. Try it.
When I get time to write the next article, I'll try and cover the Tone Curve, Channel Mixer(HSL) and Split Toning. Happy Editing. And remember, it very easy to over-edit something.... Everything in moderation!(Subtle improvements are best and most natural)
After making all the changes, export the image: File>Export. Choose your folder and other options and click the export button.
No comments:
Post a Comment